What is a Block?
Blocks are the fundamental elements that create and modify geometry in nTop; therefore, you can access all operations through them. The block system provides a visual programming environment that captures engineering workflows within the notebook while creating geometry.
The Concept
Each block performs a specific task, using a particular set of inputs to compute the output automatically. For example, the Import Part block imports a part, and the Shell block shells a part based on the desired inputs.
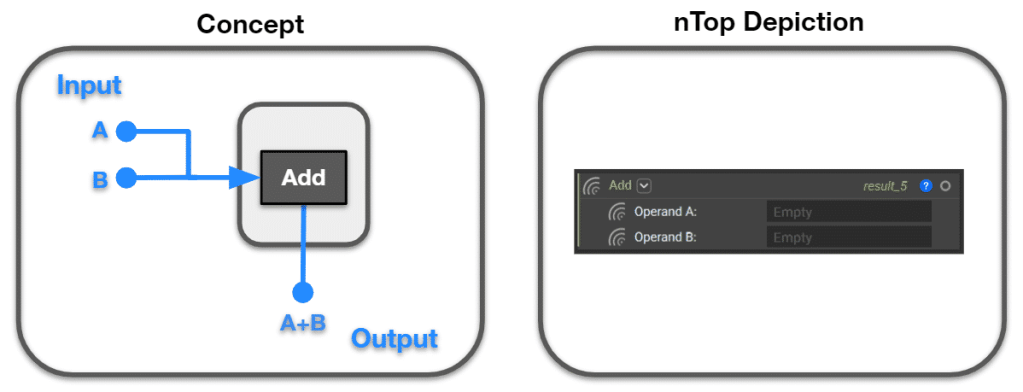
Depending on its type, a block’s output can be seen as a geometric representation on the screen or as a computed value at the top right of the block. The Add block shown above displays the output value of 2 due to adding Operand A and Operand B together.
Block Anatomy
Every block in nTop has a similar structure, and we define them by their Name, Inputs, and Output. All Inputs and Outputs have icons next to them, indicating the Input or Output Type.

Block Details
Clicking on the question mark icon opens up the information panel, which contains the following details:
- – Information: Describes what the block does and what its inputs are
- – Properties: Accessible data from the block (center point, bounding box, etc.)
- – Display: Display color and other options
- – Comment: User comments describing what the block is for
Properties and Comment panels can also be accessed via the right-click menu.

You can use the Learn More button in the Information tab of the Right Side Panel to open a Documentation page with more extensive information on what the block does and examples of how to use it.

For more information on specific blocks, go to Documentation → Block Documentation → Blocks.
Right-clicking on a block opens up a menu containing some command options for that block:
Block Status/Alert
The Info Panel will also display any alerts associated with the block. The Info (?) button’s icon and color will change to represent the Block Status. Above the Info Panel will be a description of the status. You will find an alert message indicating why the block function could not be run.
- – (?) Blue: Unbuilt/Incomplete Block
- – A block function will not run if it has incomplete inputs
- – ⚠ Yellow: Warning
- – The block function will still run and provide associated warnings.
- ⚠ Red: Error
- – A block function will not run if an error has occurred. Blocks with this status have a red overlay to help visually identify them. More information on the error can be found in the Log Panel, accessed at the bottom right of the screen. Select the ^ icon to expand it.
- – If a block with an error is nested within another block or is hidden in a collapsed section, the error icon will appear as floating icons next to that block or section. Clicking on the floating icon will snap directly to the error.

If there are errors anywhere in your Notebook, the red error icon will appear at the top next to the Notebook’s title. Clicking on this icon opens up the error log, which contains a global list of all the errors along with the affected blocks’ names and the error descriptions. Clicking on each item on the list will also take you to the corresponding location in your Notebook.
Block Colors
Blocks are color-coded when they appear in your Notebook. Different colors represent different output types. For instance, green blocks output Implicit Bodies, while purple blocks output Lattices. These colors help distinguish the type of geometry you are working with.

Block Types
The Output Type of a block indicates its Type. Each Type has its own set of Properties, containing Property chips that can be added to the Notebook or brought into another block as input via drag and drop. Below is an example comparison of the Sphere and Box Type properties.

- Sphere Properties:
- – body
- – bounding box
- – center
- – radius
- – scalar field
- Box Properties:
- – axis 1
- – axis 2
- – axis 3
- – body
- – bounding box
- – centroid
- – max point
- – min point
- – scalar field
When using a block as Input for another block, the Block Type should match the Type of Input it goes into:

A Point Block being used in a Point Input
Some Block Types can be converted automatically. A dot in the upper right-hand corner of the icon indicates that a conversion took place:

A Vector Block being used in a Point Input
The Information tab in the block’s information panel has a section for what Types the block can be converted to. This information should also match the Conversions chips shown under the block’s Properties tab. To see the list of Types and the associated icons, go to Documentation → Block Documentation → Types.
Lists and Groups
All blocks can exist as either singular entities or as a list. A list block contains multiple blocks of the same type within one single block, like a list. Working with list blocks is called List Processing.
Groups are similar to lists, except they can contain a combination of any block type. When a process runs on a list or group block, it runs the process on every list or group item.

Lists are denoted by three rectangles at the bottom left corner of the Type icon. The list size is shown in parentheses next to the Block Name and a plus button at the top right for adding items to the list. Individual list items can be accessed by going to the List Elements section in the List Block’s Properties tab.
