Basics of nTop
Understanding the nTop Notebook
The Notebook documents and represents an engineering workflow in nTop. It records all functions performed and captures a process that can work on any part, allowing users to reuse the workflow to generate new designs.
Notebook & Blocks
Comparable to the model tree in traditional CAD software, the Notebook keeps a record of modeling operations. In nTop, you add a series of different Blocks to the Notebook to create a workflow, where each block serves one specific function. When given a set of inputs, a block computes an output that can also be used as input for other blocks.

Note that unlike in traditional CAD, all operations in nTop are not performed on the geometry itself. Since the geometry on the screen is only a representation of the mathematical equations behind the scene, it is our choice of inputs or parameters within the Notebook that creates and manipulates the geometry.

Data types for Blocks
Every function (block) in nTop works with specific data types. Some blocks create 3D geometry, others output numbers, points and more data types.
nTop prevents connections between mismatched types. This is a useful paradigm that works similar to types in programming languages because it:
- Ensures Reliability: Helps you build complex designs by ensuring you’re always using the right data in the right place.
- Prevents Errors: Catches mistakes immediately, preventing problems before they grow.
- Enhances Clarity: Different colors and icons visually show expected data types, making workflows easy to understand.

Working with Variables
Any block or input can be turned into a variable, allowing for easy access, reference, and manipulation. Variables are a convenient way to organize your workflow and streamline your design process.
By declaring a block a variable, all of its components can be changed quickly and parametrically. An entire Notebook of functions can automatically be computed and rebuilt by changing inputs in the variable. Use variables to drive your workflow with key parameters and streamline your design process.
A block variable looks different from a regular block. The block name moves to the left and sits on top of the block color. Below you can see a variable vs. a regular block.
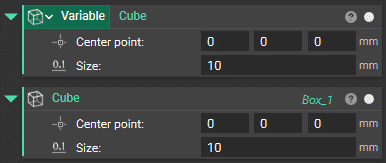
When the variable is used as an input for another block, the variable is represented by a chip.
You can also change an input parameter to a variable. Just right-click over a parameter name and select “Make Variable”. A parameter variable is a useful way to quickly change a specific aspect of a block. It makes it clear what input can change.
Go to the Properties tab in the Block Details panel by clicking on the question mark icon at the top right of the block. Drag any property into the Notebook to create a variable of that property. These properties are linked to the block they came from.
You can also drag any chip directly into an input of another block instead of the Notebook.


Notebook Management Tips
Your Notebook serves as a documentation of your work, and a little housekeeping goes a long way. Keeping it organized and commented is helpful for future use and sharing it with others. Expand each item below for a helpful tip on how to build the perfect notebook.
Notebook Title
It is good practice to give the Notebook a fitting name that matches the file name and to give a full description of what the workflow in the Notebook does.

Adding and Deleting Blocks
Most workflows in nTop will begin with importing a CAD or mesh object and converting it to an Implicit body, which are all done through adding specific blocks to the Notebook.
To perform operations in nTop, you can add Blocks to the Notebook via the Ribbon or the Search Bar:
Method 1:
Click on Block icons or select from the drop-down list in the Ribbon.
Show/hide the ribbon with Ctrl+D
Method 2:
Type the block name in the Search Bar.
Shortcut to go to Search Bar is Ctrl+L
Method 3:
Double-click where you want to add a block to the Notebook, and search/select which block you want to add.

To remove a block, select it then press the delete key or right-click and select delete from the menu:

To select multiple Blocks, hold Ctrl key.

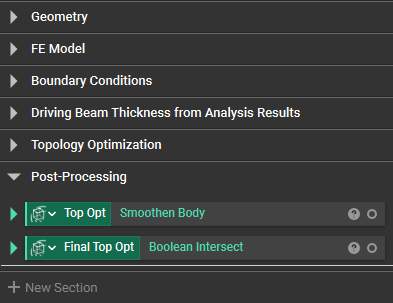
Sections
Use sections to organize the different portions of your workflow and name them appropriately. This way you can stay organized by keeping sections you are not working on collapsed and be able to quickly find the part of the workflow you want to change.
Inputs and Outputs
Above and below the sections of your Notebook you will find areas where you can define one or more inputs and a single output. Variables are dragged into these areas to call out what will be the inputs and output of a custom block.

Comments
Use comments to document the steps of your work, focusing on the purpose of the block. The comment can be made in the Notebook directly by hovering over the top left corner of a block and then clicking on the bubble symbol or through the Block Details panel of a block.
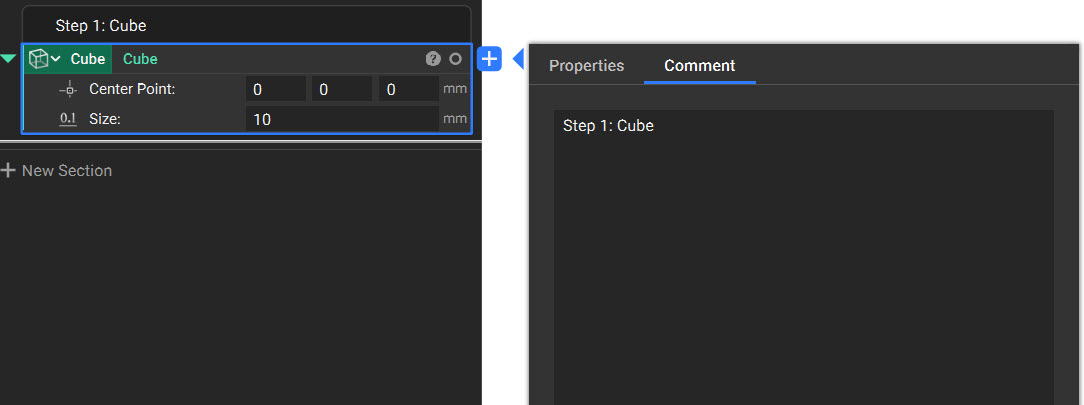
Note: The comment is attached to the block, so if the block is moved or deleted the comment will go with it.
Variables
You can make any block or parameter in the Notebook into a variable. By declaring a block a variable, all of its components can be changed quickly and parametrically. An entire Notebook of functions can automatically be computed and rebuilt by changing inputs in the variable. Variables allow for quick and easy organization and understanding of your Notebook since the variable blocks don’t get nested within another block.
A block variable looks different from a regular block. The block name moves to the left and sits on top of the block color. Below you can see a variable vs. a regular block.

Once a block is made into a variable, it remains in the Notebook. When the variable is used as an input for another block, the variable is represented by a chip.
Notebook Outline
Use the icon in the top left of the Notebook to expand and collapse the Notebook Outline. This Outline lets you view the Blocks in your Notebook from a high level and quickly select and navigate them.
In addition to quickly navigating to blocks, the Outline visualizes where variables are used in your Notebook. When you select a block in the Outline, a bright blue highlight will appear around the block in the Notebook. If that block is a variable instanced within another block, a duller blue highlight will appear on the block that references it.
Custom Blocks
With nTop, it is possible to package longer workflows into a block, that can then be used in other Notebooks to produce the desired outputs with a given set of inputs.
This is a powerful and unique feature that makes developing an nTop notebook similar to traditional programming language where functions can be packaged as modules and reused in other projects.

Custom blocks can be created by setting up the Notebook in a specific format. To accomplish this, define the important parameters as inputs and the desired outcome as the output.
Custom blocks are shareable, and we recommend saving them with a name that begins with CB, the acronym for “custom block”. Once you add them to your My Blocks folder, you can search them in nTop, as you would any native block, by typing the block’s name into the search bar.